Showing posts with label Achievement Tips. Show all posts

Friday, May 8, 2009

Assembly of Iron (aka Iron Council) Easy mode.


These guys are a walk in the park compared to Freya.


Easy mode is kill biggest to smallest and hard mode is smallest to biggest. Obviously we did easy mode first.


You will need 3 tanks - each of them drag their add off out of range of each other. We found that anything other than a bear able to tank Sarth 3D was getting oneshot on the big guy with our current gear level (ie mostly i213 with i226 highlights), so highly recommend something like this:


Big guy - bear

Middle guy - Warrior

Small guy - DK


The big guy puts a NASTY debuff (edit: our bear tank decided to call me on my terminology. This is apparently a magic debuff. But you lot knew what I meant, right? You have all read the technicalities of the fight on wowwiki or something eh?) on your bear which needs to be decursed (edit: *cough* dispelled by a pally or a priest, happy HB?) INSTANTLY. Make sure you have an allocated decurser watching the tank's cast bar. They should be spamming the decurse as the big guy casts his "Me squash tank now" spell as it starts ticking within a second! Master that and it's just tank and spank.


The middle guy throws out some serious damage but nothing that a Naxx25 holy pally cant solo heal with a bit of mana management. Make sure that if the tank moves the boss that he let's the healer know. Once big guy is down, we rotate tanks. Bear tanks middle guy and warrior heads off to help on little guy. Middle guy is again just watch for aoe (RUN AWAY LITTLE GIRL! RUN AWAY!) and tank and spank.


Little guy needs constant interrupts on whatever spell it is he does. When he is the last man standing he will periodically turn into a flying electrical octopus and totally pwn anything he touches. RUN AWAY! We dont care where (the tanks will follow and be ready to pick it up afterwards) just dont trap yourself in a corner.


Through all this, there will periodically be blue and green "fire" on the ground. Keep the bosses OUT of all this stuff. For you, Blue is good, green is BAD. (why couldn't they make it the other way aroung - cos alliteration makes things easier). So stand in blue for DPS buffs, and run out of green (or die).


Then the last boss is at about 10%, quickly suck down an iron boot flask and get yourself an extra achievement!

Friday, April 24, 2009

Razorscale/gore/fang/face/wing/thing

For some reason I keep calling this boss some variant of razor that isn't actually its name. No idea why, but I blame Nethersprite. It's all his fault.

Anyway, there are a few strats out there for this boss, some involve spreading out, some involve bunching up. We kinda did something halfway inbetween and MAN did it make healing easy. Again, I am not writing up the boss strat, you can look that up yourself.
Firstly, and importantly: Stay inside the circle (or as close to that as possible).

Phase 1 (100%-50%)
We had 3 tanks, our warrior was in charge of tanking the whirlwind guy. The other two picked up everything else, one on the left side, one on the right. Melee were split into 2 groups, one for the left tank, one for the right tank. It was melee's job to interrupt the chain lightnings. Really important to stay on top of that as that chain lightning HURTS and can oneshot the last person on the chain (as I found painfully one time). There was one MT healer allocated to each tank.

Ranged hang out in the middle, and dps whatever. BUT if the big whirlwind guy comes out, they have to switch targets and burn that add down asap. Melee STAY AWAY or you will become very splattered.

Raid healers hang out in the middle, and keep an eye on melee and ranged. If melee are doing their job, there should be little AoE damage. But hang on... what about the blue flame? I hear you ask. AH....

Razorface, we noticed, targets the closest person to it with the blue flame. So we had a designated "flame tank" whose job it was to dance underneath Razorblade and attract his attention. This allowed the healers a much better chance of keeping people alive. Raid damage became controllable and predictable. We have not seen this written anywhere, but we experimented with it, and it seems to be holding true.

At some point you will bring Razorgore down and it will be time to PWN FACE. Adds, at this stage, should be left to their own devices and held in check by the tanks. Resto druids should be keeping these tanks alive (as trees cant DPS. Fail trees). Everyone and his pet worg should be throwing everything they have got at Razorfang. Pop cooldowns, pop heroism, pop haste pots... think of sarth 3d type zerg then buff that drake by 175% (I'm not kidding). Yell at your DPS to go hard, I wanna see holy novas, holy shocks and electricity! I wanna see crits and hysteria! I want to see that boss percentage SUB 75% on that first grounding.

Ok, up it flies and it's time to head back into position and back to taking care of business.

Second grounding you want that proto-mechano-drake sub 50%. GO hard. This fight is much easier if you only have 2 ground phases not 3. 3 is doable, but you are likely to down it after enrage.

Phase 2 (50%-splat)
Ok, now get your MT (who should be the whirlwind tank) straight onto that dragon cos all of a sudden there's an aggro table! so be careful! Now, the tanks will be taking a debuff called "fuse armour". When it hits 2 stacks swap tanks. All Tank healers keep the current MT up.

DPS should get all the adds down first to free up the tanks to tank razorthing. Then everyone on the boss. Kill kill kill! Beat that enrage timer, check CDs at this point.

See that circle on the ground? Yeah? good. The current tank needs to kite backwards along that circle, like grobbulous. NO ONE gets ahead of the tank on that fight or you DIE. Watch for fire on the ground melee and all is good.

That's it. Not a difficult fight, just a lot of damage going around and a lot of chaos and some SERIOUS DPS required.

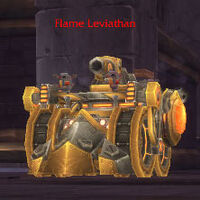
25 Flame Leviathan - plus two or three towers

Everyone knows how to do Flame Leviathan, I am not going to explain the basic strat, I am going to explain things that are VITAL to getting a two or three towers under control. Four towers is an entirely different matter, that will have it's own strat post.

There was a lot of confusion about "hard mode". When you start, you can initiate the event by talking to one of two people. If you talk to Brann, none of the orbital defense systems are activated. This is Normal Mode.

If you talk to Norgs (as I affectionately dubbed him) he sets off the towers. All of them. As you move through the gauntlet you DESTROY the ones you do not want to do, leaving up the ones you do.

The towers we are currently doing (in order of preference) include:
Tower of Storms (Thorim's Hammer) – deals Boosts Flame Leviathan's Physical Damage by 25%. Shortly after the fight starts, Flame Leviathan will activate Thorim's Hammer. Thorim's Hammer causes pillars of light to appear and shortly afterward do around 10% (150k or so) damage to any targets under the beam along with a 1% damage AOE to all vehicles. Total of about 20 Beams. Flame Leviathan will activate this only once. Just, dont stand in any beams and you will be ok.

Tower of Flames (Mimiron's Inferno) – Boosts Flame Leviathan's Fire Damage by 50%. Shortly after the fight starts, Flame Leviathan will activate Mimiron's Inferno. Mimiron's Inferno causes fiery orbs to fall from the sky in a slowly set path. Orbs start where Flame Leviathan entered the room and continues in a clockwise direction in a diamond formation. Orb strikes deals fire damage to all nearby enemies, leave behind a flaming blaze that deal damage over time when touched. Effect lasts for the entire fight but are pretty easy to avoid.

Tower of Frost (Hodir's Fury) – Hodir's Fury cause's several White-Teal beams to appear and follow players around. The beam itself does no damage but after it stops moving on top of a vehicle, it will call down a ball of frost that deals frost damage to all nearby enemies and entombing them in ice where they take an additional 1% damage per second. Ice is broken by a fire attack. Effect lasts for the entire fight. Simply move directly forward or backward when you see the beam"lock on" to you and you will avoid this.

The above three towers are pretty easy mechanically. One leaves a trail of fire you need to avoid (easy if you pay attention), one has big beams from the sky that chase you around and one puts out a singular random event of big blue AoE bolts from the sky. Save shields for this event. Apart from that, it is business as usual, except FL has more health, so you just need to be good at not taking damage and good at dealing it.

Shutdowns
The key to this fight are the shutdowns.
Send 2-3 people up as soon as FL is engaged. They are marked, their vehicles are marked, and we have allocated a chopper to each player to pick them up and deliver them back to their vehicle after shut down. They then quickly grab some pyrite and are thrown up as soon as possible. Getting this cycle right, ensuring there is minimal down time and that the people do not die is the way to kill this boss.

The 3 people are 2 DPS and a DPS off healer (like an ele shammy, they do this the best). If you have no healer up there you will die. It's not a lot of damage but it is enough to kill most guilds in Naxx or early Ulduar gear. You NEED to have ranged go up as when you are on top of FL you cannot move. You are thrown to a position with a tower to kill. Kill your tower, then target another tower and kill it asap. Once all 4 towers are destroyed, FL shutsdown and the DPS are flung off the top of the tower.
Once Flame leviathan has finished repairing his towers (the reason for the shutdown in the first place) he comes out of shutdown and activates again. As soon as shutdown is over, you can send up your team again to repeat the process.

DPS during a shutdown
This is where about 80% of your damage will come from. FL takes extra damage while in shutdown - take advantage of that.

Demolishers must be fully stocked or close to it (it takes 2 pyrite to fill the tanks), and they need to launch all their pyrite at FL during this phase. Those pyrite launchers do stupid amounts of damage. It doesn't matter if you dont DPS any other time (apart from keeping tar alight) your main job is to make sure all that pyrite lands during shutdown. If you are a passenger who is not on the tower, keep stocked with pyrite, mash your rockets (2) and keep tar alight (1).

Siege engine passengers should be keeping the odd tar alight with (1) but mostly mashing (2) as that is a very powerful attack.

Choppers get that tar down, and keep laying it! If you get bored, grab some pyrite and shuffle it near the demolishers.
Doing all of the above should get you a really good dose of death on FL.

What to do when NOT in shutdown
DPS is not so important at this point, but not unimportant, if that makes sense.

Demolisher passengers (once back in the vehicle) grab pyrite asap. Those not getting flung should be shooting down pyrite for the flung ones to quickly retrieve. Once they are done, load yourselves up. Keep tar alight, and DPS when you have time. Your job is to stay as alive as possible. Stay at range.

Siege engines get in and interrupt the flame jets. Passengers keep mashing (2) as you are the main DPS dealers for this phase of the fight and only hit (1) when you see unlit tar. When the 5s warning comes in your fave boss mod, all siege engines get away from FL so that you have a good head start on kiting if you happen to be picked. If Thorim's hammer comes, make sure you have a shield ready (1 min CD). Passengers, if you can, make sure that you shoot down pyrite when possible as well!

Choppers will pick up their person, and return them to their vehicle as fast as they can, then back to dodging around and dropping tar. Again, try shuffling pyrite into the middle to help the demolishers.

What to do when kiting
Run away. Stay as far away as possible. Passenger should be liting tar as they go. Kite the FL through tar, I cannot stress how important that is, and make sure that tar is lit up. Avoid the orbital defense fires, try not to get trapped by them. Easy *cough* yes, easy!

That's it. Rinse repeat. Make sure that you take as little damage as possible, and you maximise DPS during shutdown. It should take 2-3 shutdowns to get the boss down depending on how well you kite him through tar at other times.
This applies to 10 man as well, just fling 1-2 people not 2-3!

Practise your shutdowns with two or three towers up ready for four towers. Two or three towers have been nerfed a fair bit recently, and they are a lot easier now than when this guide was first written (We found that 4 towers now is as hard as 2 towers was back in 3.1.0). Yes, you can almost certainly Zerg through 2 towers now with no shutdowns. Three you might be pushing your luck, and doing 4 you definately need to shutdown, so you may as well get some pratcise in. Getting the shutdowns means the fight goes a lot quicker as well leaving you more time for working toward other hardmodes and Yogg!
Wednesday, April 1, 2009

Volazj's Quick Demise - healer PoV

Somehow, after many, MANY hours of trying, I managed to get this done yesterday. As a paladin healer (specced arena 2s PvP) I found that I was the main reason we were not making this in 2mins.

Reasoning is as follows:
1) You do not "pop out" for assistance of insanity until you have taken down everyone bar one of your shadows is dead by your hand. I noticed this late in the piece.
2) I was taking far too long to kill the tank
3) I was not pumping out enough DPS to break out for assistance and still be able to make the 2 min timer.

What we ended up doing was that I respecced ret and wore most of my healing gear. This did a couple of things. It meant that my shadow did not cast healing spells, making it much faster for everyone else to kill their shadows. I also swapped my weapon/shield to a DPS weapon once inside insanity. I went for the ranged first, which dragged the melee with me and aoe'ed everyone down. I also left the tank for last (to get assistance on that one) - the tank was extra tanky as they were not going to get as many heals as usual. Everyone one who could cast a healing spell helped with healing when we popped out.

This technique got the damn achievement done as SOON as we did this. We had been failing on it for a good couple of hours, trying to figure out what was going wrong. As a holy pally, my shadow was too hard to kill and healed too well. As a holy pally, I didn't do enough DPS to kill my shadows fast enough.

Respeccing ret fixed all of these issues and we did 2 insanities and killed the guy with 10s to spare. I highly recommend any healing class respec to a DPS spec and wear a combo of your healing gear. There isnt a lot of healing required in this fight if you burn through it quickly. The slower you do this fight, the more you need healing. Trust your group to self manage somewhat.